How to insert data into a MySQL table using Spring Data JPA
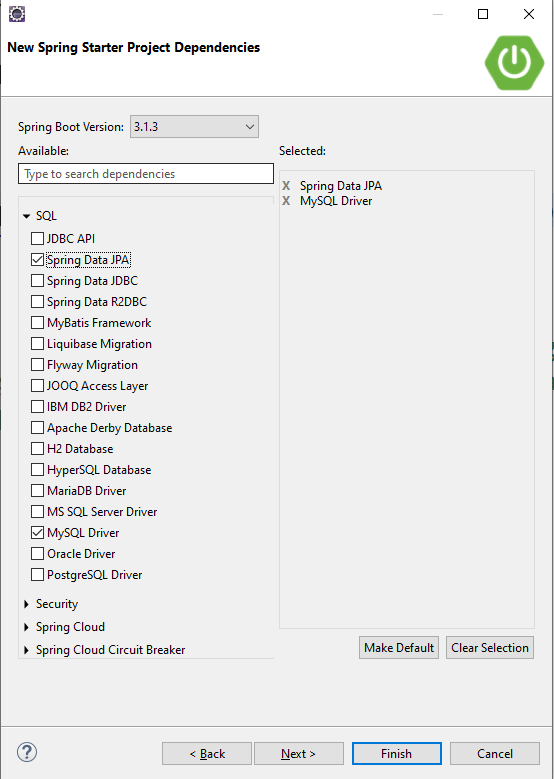
Step 1: Set up Your Project
Step 2: Create database using MySql
Step 3: Configure Your Database
Step 4: Create an Entity Class
Step 5: Create a Repository Interface name EmployeeRepository.java
Step 6: Create a Insert Data in (Main Method) Class DBOperationRunner.java
Step 7: Create a Main Application Class SpringJdbcMysqlApplication.java
Step 8: Run Your ApplicationCreate a new Spring Boot project using your preferred development environment (e.g., Eclipse or your IDE).
Step 1: Set up Your Project

Step 2: Create database using MySQL
Create Database cwp
use cwp;
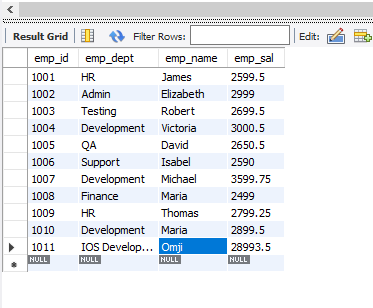
select * from employee;Step 3: Configure Your Database

In the SpringJDBCMysql\src\main\resources\application.properties file, configure your MySQL database connection properties:
path = SpringJDBCMysql\src\main\resources\application.propertiesspring.datasource.driver-class-name=com.mysql.cj.jdbc.Driver
spring.datasource.url=jdbc:mysql://localhost:3306/cwp
spring.datasource.username=root
spring.datasource.password=admin
spring.jpa.database-platform=org.hibernate.dialect.MySQL8Dialect
spring.jpa.show-sql=true
spring.jpa.hibernate.ddl-auto=updateStep 4: Create an Entity Class
Create an entity class representing the data you want to insert into the database. For example, let’s say you have a “Employee.java” entity:
path = SpringJDBCMysql\src\main\java\in\p4n\Employee.javapackage in.p4n;
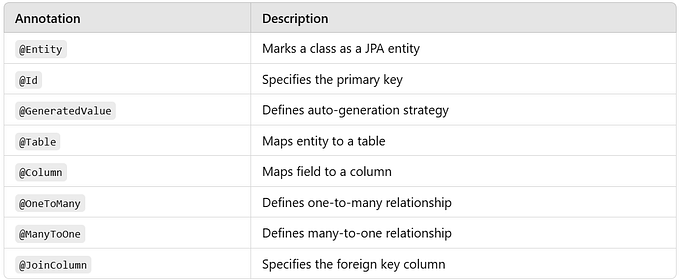
import jakarta.persistence.Entity;
import jakarta.persistence.Id;
@Entity
public class Employee {
@Id
private Integer empId;
private String empName;
private Double empSal;
private String empDept;
public Employee() {
}
public Employee(Integer empId, String empName, Double empSal, String empDept) {
super();
this.empId = empId;
this.empName = empName;
this.empSal = empSal;
this.empDept = empDept;
}
public Integer getEmpId() {
return empId;
}
public void setEmpId(Integer empId) {
this.empId = empId;
}
public String getEmpName() {
return empName;
}
public void setEmpName(String empName) {
this.empName = empName;
}
public Double getEmpSal() {
return empSal;
}
public void setEmpSal(Double empSal) {
this.empSal = empSal;
}
public String getEmpDept() {
return empDept;
}
public void setEmpDept(String empDept) {
this.empDept = empDept;
}
}Step 5: Create a Repository Interface name EmployeeRepository.java
Create a repository interface for your entity by extending JpaRepository<Employee, Integer>:
path = SpringJDBCMysql\src\main\java\in\p4n\EmployeeRepository.javapackage in.p4n;
import org.springframework.data.jpa.repository.JpaRepository;
import org.springframework.stereotype.Repository;
@Repository
public interface EmployeeRepository extends JpaRepository<Employee, Integer> {
}Step 6: Create a Insert Data in (Main Method) Class DBOperationRunner.java
Create a service class that uses the repository to insert data:
path = SpringJDBCMysql\src\main\java\in\p4n\DBOperationRunner.javapackage in.p4n;
import java.util.Arrays;
import java.util.List;
import org.springframework.beans.factory.annotation.Autowired;
import org.springframework.boot.CommandLineRunner;
import org.springframework.stereotype.Component;
@Component
public class DBOperationRunner implements CommandLineRunner {
@Autowired
EmployeeRepository eRepo;
@Override
public void run(String... args) throws Exception {
eRepo.saveAll(Arrays.asList(
new Employee(1001,"James",2599.5,"HR"),
new Employee(1002,"Elizabeth",2999.0,"Admin"),
new Employee(1003,"Robert",2699.5,"Testing"),
new Employee(1004,"Victoria",3000.5,"Development"),
new Employee(1005,"David",2650.5,"QA"),
new Employee(1006,"Isabel",2590.0,"Support"),
new Employee(1007,"Michael",3599.75,"Development"),
new Employee(1008,"Maria",2499.0,"Finance"),
new Employee(1009,"Thomas",2799.25,"HR"),
new Employee(1010,"Maria",2899.5,"Development"),
new Employee(1011,"Omji",28993.5,"IOS Development"))
);
System.out.println("----------All Data saved into Database----------------------");
}
}Step 7: Create a Main Application Class SpringJdbcMysqlApplication.java
Create a main application class with a main method to run your Spring Boot application:
Path = SpringJDBCMysql\src\main\java\in\p4n\SpringJdbcMysqlApplication.javapackage in.p4n;
import org.springframework.boot.SpringApplication;
import org.springframework.boot.autoconfigure.SpringBootApplication;
@SpringBootApplication
public class SpringJdbcMysqlApplication {
public static void main(String[] args) {
SpringApplication.run(SpringJdbcMysqlApplication.class, args);
}
}Step 8: Run Your Application
Start your Spring Boot application.
When you run your application, it will insert the user data into the “employee” table in the MySQL database.
Output like this